Results 1 to 14 of 14

Thread: NM's (and just a little by Assertn) Quality Enhancing Tutorial

  1. #1
    Moderator Emeritus NM's Avatar
    Join Date
    Mar 2004
    Age
    37
    Posts
    1,800

    NM's (and just a little by Assertn) Quality Enhancing Tutorial

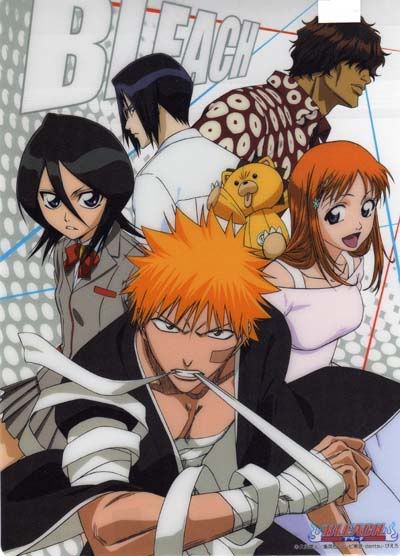
    1. First off, your going to need your image. For this tutorial, I'll be using this image of Bleach (sorry about that white box on Chad's head)


    2. Open up your Photoshop, then open up the picture. Once you have it opened, Duplicate it twice, so you should have a total of 3 layers.

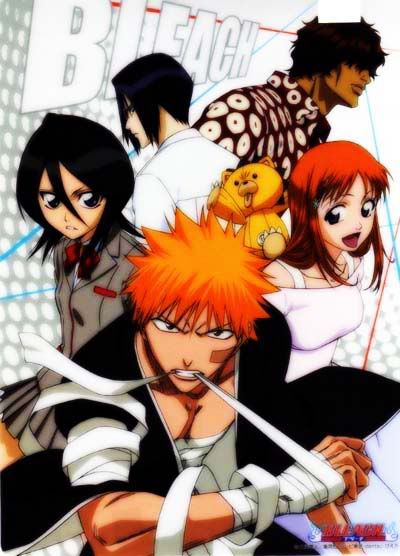
    3. Now what we're going to be doing is using the Gaussian Blur (Filter -> Blur -> Gaussian Blur). We'll start with the top most layer. For this Bleach image, set the Gaussian to 2.5. You should have something like this now.


    4. Now go to the middle layer. Again, go to Filter -> Blur -> Gaussian Blur, and this time, set the blur to 1.5. The image won't change, since the layer is in the middle. That's fine, but do the blur on the layer still.

    5. Now on your top layer, set the blending mode to Overlay.


    6. For the middle layer, we're going to be changing this blending mode as well. This is where you decide whether your image looks much better with your chosen blending mode. Once you find the right one, merge the layers together and you have a better quality image! Here's what it looks like when I put it in Soft Light.


    And thats it! Simple enough, huh? One thing I should mention: the Gaussian Blur values are totally up to you. As you saw in the tutorial, I gave the top most layer a higher value and the middle layer a value lower than that. Same for merging at the end. These usually work for me but again, its up to you. And on another note, you don't have to use Overlay. For me, Overlay + another blending mode usually gives me good results so I stick to that.

    Its my first tutorial so I hope it helps you all!
    This fantastic Sousuke sig was made by the one and only Lucifus! Thanks man!

  2. #2

    NM's Quality Enhancing Tutorial

    Nice beginner tutorial NM I'm sure it will help out a lot of people. Good job.

    Well NM told me to post this so I will, IMO I dont think you should merge the layers when your done. It changes the final product of the render.

  3. #3
    ANBU Captain Foomanchew24's Avatar
    Join Date
    Apr 2004
    Location
    Utah
    Age
    47
    Posts
    739

    NM's Quality Enhancing Tutorial

    Personnal I like to make a copy of the original render and set the top layer to hardlight. Just my 2 cents.

    Sig made by Lucifus

  4. #4
    Moderator Emeritus NM's Avatar
    Join Date
    Mar 2004
    Age
    37
    Posts
    1,800

    NM's Quality Enhancing Tutorial

    Thanks guys. About merging, thats also your choice.

    @Fooman: Feel free to comment. Any useful information for the tutorial is welcome! [img]i/expressions/face-icon-small-smile.gif[/img]
    This fantastic Sousuke sig was made by the one and only Lucifus! Thanks man!

  5. #5

    NM's Quality Enhancing Tutorial

    You should add that you can use median instead of gaussian blur.

    Nice tut NM! We'll proabably see some nice render from the all the new guys.

  6. #6

    NM's Quality Enhancing Tutorial

    Hard Light is the same as Overlay, no?

  7. #7
    ANBU Captain Foomanchew24's Avatar
    Join Date
    Apr 2004
    Location
    Utah
    Age
    47
    Posts
    739

    NM's Quality Enhancing Tutorial

    Nope, why would you have the option of hard light and overlay if they were both the same?

    Sig made by Lucifus

  8. #8
    Graphics Whore Phoenix20578's Avatar
    Join Date
    Aug 2005
    Location
    Jersey
    Age
    37
    Posts
    1,879

    NM's Quality Enhancing Tutorial


    Oh yeah, I think there's a big difference now. Thanks times a million NM!


    For all you awesome people, it's just Phoenix. The numbers are just the amount of times people misspell it.

  9. #9
    ANBU Captain 6Zabuza9's Avatar
    Join Date
    Sep 2005
    Location
    Pallet Town
    Age
    34
    Posts
    606

    NM's Quality Enhancing Tutorial

    how do u merge

    ty psj for this sig

  10. #10
    Gets more ass than a toilet seat! Eurasian's Avatar
    Join Date
    May 2004
    Age
    87
    Posts
    1,571

    NM's Quality Enhancing Tutorial

    Originally posted by: 6Zabuza9
    how do u merge
    you can go to layers -> merge down or press ctrl+e.

    I tried my best...

  11. #11
    Awesome user with default custom title Deblas's Avatar
    Join Date
    Jul 2004
    Location
    Raftel
    Posts
    2,023

    NM's Quality Enhancing Tutorial

    How do you duplicate it into 3 layers?

    --------------------------------"THE DROPOUT CREW"-------------------------------
    ___________________Captain Dropout For Life__________________

  12. #12
    Junior Sexfiend PSJ's Avatar
    Join Date
    Jul 2003
    Location
    At a bar
    Age
    36
    Posts
    5,104

    NM's Quality Enhancing Tutorial

    You rightclick the image and then "duplicate layer" 3 times.

  13. #13

    NM's Quality Enhancing Tutorial

    Ctrl+J - shortcut for duplicate. Always use keyboard shortcuts whenever possible [img]i/expressions/face-icon-small-smile.gif[/img]

  14. #14

    NM's Quality Enhancing Tutorial

    Good job NM and everybody else helping out.

Posting Permissions

  • You may not post new threads
  • You may not post replies
  • You may not post attachments
  • You may not edit your posts
  •